= = = F3L METHOD = = =
By Jack Eisenmann
= INTRO =
This method is for solving the Rubik's Revenge, or the 4 by 4 cube. The concepts can be extended to solve a cube of any size: from 2 by 2 to 20 by 20. This method is considerably different from current popular methods, where one solves centres, pairs edges, and solves the cube as a 3 by 3. The unique feature of the F3L method is that there is no 3 by 3 step at the end, because all pieces are solved in place by the end. The steps are as follows:
-
1.Solve a white centre on the bottom.
-
2.Solve centre-edge and edge-corner columns around the F3L (that stands for first 3 layers.)
-
3.Solve the LL corners.
-
4.Solve the LL edges.
= STEP 1 =
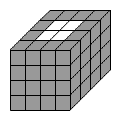
Solve the 4 white pieces on the centre of a face, like in the picture. For this step, you will hold the white face on top.
To solve the centres, we must solve them one column at a time. First we find 2 centres to match together:
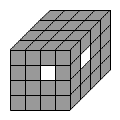
To match these centres, we would do R2 d'. R2 turns the right centre so that it can be matched, and d' turns the bottom centre slice to pair the 2 pieces together. The result will be a vertical pair of centres. Next, do r to turn the pair so that it is in the top face. Then find 2 more white centres:
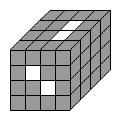
The centres in the front face are not matched correctly. To match them so they are adjacent, we must do u F u'. This moves the top front centre out of the front face, aligns the second centre, and matches them together. Now that we have our pair, we can do l' to bring the column of pieces into the top layer. By now you should have all the white centre pieces in the top face.
= STEP 2 =
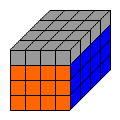
Now we solve columns of pieces in the F3L, like in the picture above. We alternate between solving centre-edge columns and edge-corner columns. Shown below is how a centre-edge column looks:
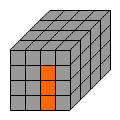
Note that our white side is now at the bottom, because we no longer need to look at it. We first solve all of the centre-edge columns on one side, then an adjacent edge-corner column, then all the centre-edge columns on another face, etc etc, until all of the columns are solved.
To solve a centre-edge column, we first match 2 centres (like in step 1).
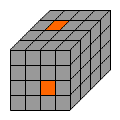
To match the orange centres in the picture, we must do F' r U' r'. First we align the front centre, then we match, then we move the centre pair out of the way, then we turn the r slice back (remember that we still want to keep our white centres solved!) Then look for an edge with an orange sticker and a white (bottom color) sticker:
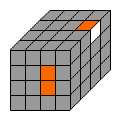
If we do F' R' F, the cente-edge column will be solved. We align the centres first, then we match the edge with the centres, and lastly we turn the centre-edge column into place.
Next, solve the other centre-edge column on the same face. We form the centre-edge column in a similar fashion, except now we must be careful not to destroy the first centre-edge column. In the picture below, we have created our second centre-edge column:
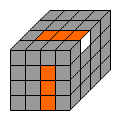
One's first instinct would be to start doing U l, but this move will ruin the white face, and there is no way to fix it without unsolving the other centre-edge pair. Instead, we must take an indirect approach, by first aligning both centre-edge columns so they are in the same slice, displacing the first centre-edge column, putting the second one into place, and repositioning the first one. The move sequence to do this is U' r' F2 r.
Now that both centre-edge pairs are solved in the orange face, we must solve the edge-corner column to the left or to the right of it. We match the edges first, then a corner, then we position the column.
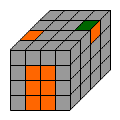
To match the edges above, we would do b' U' b. This preserves all other parts of the cube which are solved.
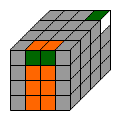
To match the corner with our edge pair, we just do R'. To place our newly formed edge-corner column, we would do U L.
After you make the edge-corner column, you continue to solve the centre-edge column next to it, then the next edge-corner column, and you continue until you've wrapped around the entire F3L so that all the pieces are solved.
= STEP 3 =
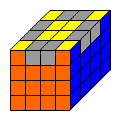
We solve the last 4 corners. As you see in the picture, the last centre pieces (the yellow ones) must be solved by now, because all the other centre pieces are in place.
One can use traditional 3 by 3 algorithms to solve the 4 corners. Lars Petrus has an easy strategy for doing this on his page:
http://lar5.com/cube/fas5.html
http://lar5.com/cube/fas6.html
In the Petrus method, the edge orientation is already solved, but in the F3L method we worry about the edges after the corners.
= STEP 4 =
Now we solve the rest of the cube. This is the most difficult step to master. We must rely on commutators to solve a couple edge pieces at a time. To learn how to do commutators, visit Ryan Heise's site:
http://www.ryanheise.com/cube/commutators.html
An example case is shown below:
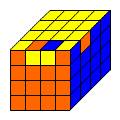
To solve this, we can do [r2] U (l D2 l') U' (l D2 l') [r2]. This is a commutator with a conjugate at the beginning and end. If we do this move sequence, the 3 edges in the picture will become solved.
Lastly, we will encounter an edge parity case 50% of the time. This is when you must swap exactly 2 edge pieces. If you encounter a parity, do this algorithm, which will swap the F and B edges like in the picture:
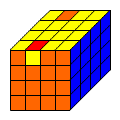
The algorithm to solve a parity is:
r' U2 r' U2 r' U2 r' U2 r'
U' r' D L2 D' r D L2 D' U
The algorithm involves first solving the parity with an odd number of quarter centre slice turns, then fixing the misplaced edges with a commutator.
Congratulations, you've solved your Rubik's Revenge!
= CREDITS =
Lars Petrus: Step 3 algorithms
Ryan Heise: Commutator technique
